Doors are essential parts of our houses and we cannot do without them. These are passages that allow us to enter or exit our houses and they have been in use since the first time man included a shelter to his basic needs.
That being said, doors come in different designs, materials, and sizes. Likely, you have come across metallic, glass, or wooden doors on various structures but whichever the case, they all serve the same function; they are entry and exit points.
However, do you know you can build your own exterior or interior door that can serve you better? Maybe you do, but do you know how to build a door? In this article, we shall take you on a step-by-step procedure you can follow to build yourself a wooden door for your house.
If you want to see more woodworking wizardry — check out our FREE 50 woodworking plans eBook

Materials needed:
- Wood
- Dowels for making joints
- A blue tape
- Resin glue
Tools needed:
- Saws: Table saws, chop saws, radial arm saws
- Sander
- Planer
- A drill press
- 4 Clamps
- Mallet
- Lock boring jig
- Try-square
- Measuring Tape
How to build a door: the procedure
Step 1: Door size determination
Doors in your home might not be of the same size and also, there is a limitation on the usage of wooden materials. Therefore, it is crucial that you determine the size of the wooden door you want to build in relation to the materials available and the size.
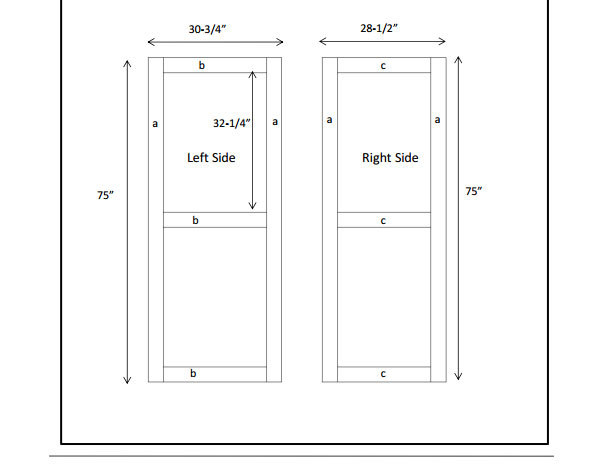
Take accurate measurements for each door frame separately for every door you want to make. Measurements will give you a rough estimate of the materials you would require for each door and subsequently the cost you will incur while building the door. You can also draw a sketch of the door with all the measurements on it. Or you can just find a good door plan online.
If you want to see more woodworking wizardry — check out our FREE 50 woodworking plans eBook
Step 2: Cut the Wood to the required size
In this step, transfer the measurements to the wooden panels and cut them according to the size of the door you are making. Plane and then sand the edges to have a smooth surface.
Step 3: Drill the doorknob hole
Use the drill to create a doorknob hole. Take measurements of 36 inches starting from the bottom of the door you are working on and make a mark. By using a try-square make a mark of 3 inches from the edge away from the initial mark.
Use a radial arm saw to make a hole and then proceed with the paddle saw to get rid of the wood at the edge of the door to create room for the latch. Fix the doorknob following the instructions laid down on the package.
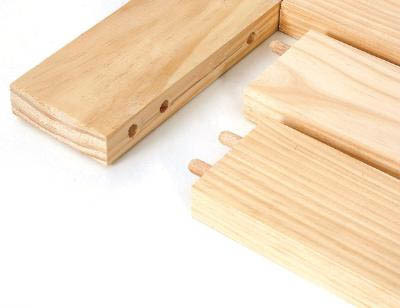
Step 4: Make a dry fit and mark the dowel positions
You can lay the door out flat on the working table and make marks denoting the right positions to place dowels. Make sure that the marks for the dowels are equally spaced from each joint. To make it precise, use point arrows and numbers to guide you on how to go about it.
If you want to see more woodworking wizardry — check out our FREE 50 woodworking plans eBook
Step 5: Make the dowel holes
To achieve a sloppy fit, make dowel holes with a ⅛ inch oversize depending on the size of the dowels. This is important to check out for any inaccuracy in those marked holes. If dowels don’t fit well, you can enlarge and bore them a little bit deeper more than the size of the dowels.
Step 6: Dry Fit and glue
At this point, you can assemble the door and then insert the dowels. To make them stronger, you need to clamp the door together to make the dowels fit well. Use a straightedge to make sure that everything is aligned well.
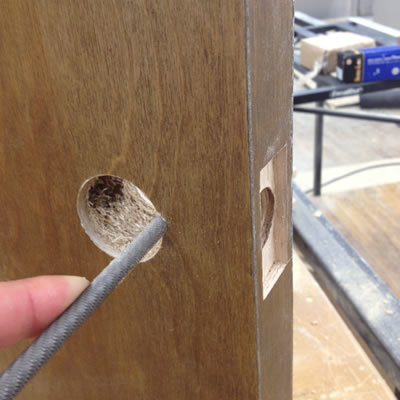
When you feel that your work is perfect, disassemble the door, and then mask the joints using blue painter’s tape as shown below: At this stage, you can mix the epoxy by adding more of the microfibers to make it thicker.
Use the mixture in the dowel holes and the unmasked part of the joint on both sides. Bring together the two wooden pieces and clamp them immediately. Use the mallet to make the clamped parts firm and square. Leave it to dry overnight.
Step 7: Hinges installation
You will need three hinges for your door to make it stable while in the doorframe. Install those hinges on the opposite side of the doorknob. Using a tape measure, make marks 6 inches from the bottom as well as 6 inches from the top respectively.

The two marks will serve as the spots for placing the two hinges. Find the center between the two hinges and make a mark for the third hinge. By now, you can easily fix the hinges.
If you want to see more woodworking wizardry — check out our FREE 50 woodworking plans eBook
Step 8: Finishing up
Get rid of the blue tape using your hand and then scrape and sand to eliminate the rest of the tape and the epoxy. Sand the whole door lightly to make it uniform and smooth to facilitate the painting process.

You may use the paint or stain to give your door a pleasant appearance. Alternatively, you can use a sealant in addition to the paint to enhance the final outlook. Leave the door to dry in preparation for final installation on the door frame.
Step 9: Installation of the door
Take the measurements of the door and the door frame to know if they fit uniformly. In the case of uniformity, use the planer to level every part of the door to make sure it fits well in the door frame.
At this step, you can easily fix the hinges on the door frame using nails or screws. Additionally, use the glue to apply to areas where the nails or screw heads are visible to make the door safe while handling and also prevent nails or screws from rusting.
If you want to see more woodworking wizardry — check out our FREE 50 woodworking plans eBook
Step 10: Final touches
On the other hand, you can trim the door on the lock side at a 3 or 5-degree bevel to minimize any chance of the door experiencing difficulties while opening.
Dry fit once more and make a mark at the center of the lockset. Once you are done, install the lock making sure that it fits well and functions properly.
Conclusion
Although there are other ways of making wooden doors, the procedure is more or less the same. The most important thing to put in the back of your mind is to know where the door you are building is going to be fixed.

That’s how you make a simple door. Therefore, you can save a lot of money by taking the task of the door making into your own hands. After all, you can only trust your work rather than hiring someone else on your behalf.
In our opinion, if you like the upper-mentioned design, you might also fancy something else along the lines of a DIY Farmhouse Dining Table or a rustic DIY Picture Frame. Also, a DIY Coffee Table made of un-aligned planks could add a nice touch-up!
If you want to see more woodworking wizardry — check out our FREE 50 woodworking plans eBook